Keeping your turtle’s shell clean is important for its health and happiness. Dirt and algae can build up, which might cause problems. This guide will show you easy steps on how to clean a turtle shell and keep it in great shape. Follow these tips to make sure your turtle stays healthy and comfortable.
The Importance of a Clean Turtle Shell
A clean turtle shell is vital for your pet’s health and well-being. Over time, dirt and algae can build up, which might cause infections or other shell issues. Regular cleaning helps maintain a healthy shell, preventing potential problems and keeping your turtle happy.
Understanding Your Turtle’s Shell
Shell Anatomy: Carapace and Plastron
Your turtle’s shell is made up of two main parts: the carapace and the plastron. The carapace is the top part of the shell, while the plastron is the underside. Both parts are essential for protecting your turtle and keeping it safe from injuries.
Different Types of Turtle Shells
Turtle shells come in various types, depending on the species. Some turtles have smooth, shiny shells, while others have more textured or patterned shells. Knowing the type of shell your turtle has can help you choose the best cleaning method.
Why Regular Cleaning is Crucial for Shell Health
Regular cleaning is crucial for shell health. Dirt and algae can cause infections and damage the shell if left unchecked. Keeping the shell clean helps prevent these issues, allowing your turtle to live a healthier, happier life.
How to Clean a Turtle Shell with Mild Soap
Cleaning your turtle’s shell with mild soap is simple and effective. Start by gathering the necessary supplies: a soft brush, mild soap, and a bowl of lukewarm water. Gently scrub the shell with the brush and soap, making sure to reach all areas. Rinse the shell well with clean water to get rid of any soap. Dry the shell with a soft towel before returning your turtle to its habitat.
Preparing for the Cleaning Process
Gathering Necessary Supplies
Before you start cleaning your turtle’s shell, gather all the necessary supplies. You’ll need:
- A soft brush: This helps gently scrub the shell without causing damage.
- Mild soap: Choose a gentle, turtle-safe soap that won’t harm your pet.
- A bowl of lukewarm water: Lukewarm water is comfortable for your turtle and helps dissolve dirt and algae.
- A soft towel: Use it to dry your turtle’s shell after cleaning.
Having everything ready ensures the process goes smoothly and efficiently.
Creating a Safe Cleaning Environment
Set up a clean, quiet space for the cleaning process. Avoid areas with strong chemicals or cleaning products that might harm your turtle. Make sure the area is brightly lit so you can see clearly while you work. A flat surface, like a clean table or counter, is ideal for both you and your turtle’s comfort and safety.
Handling Your Turtle with Care
Handle your turtle gently throughout the cleaning process. Support its body with both hands to prevent any accidental drops or stress. Place your turtle in the lukewarm water and allow it to adjust before you start cleaning. Being calm and gentle helps keep your turtle relaxed, making the cleaning process easier and more effective.
Step-by-Step Cleaning Guide
Inspecting the Shell for Damage or Abnormalities
Before you start cleaning, carefully inspect your turtle’s shell for any signs of damage or abnormalities. Look for cracks, soft spots, or unusual growths. If you notice any issues, consult a veterinarian before proceeding with the cleaning. Ensuring the shell is in good condition is crucial for a safe and effective cleaning process.
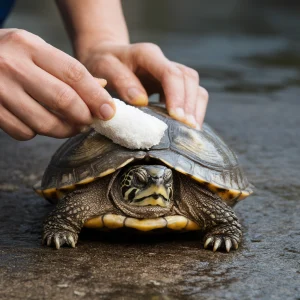
Gentle Brushing to Remove Debris
Begin by gently brushing the shell with a soft brush. Use light, circular motions to remove loose dirt and debris. Be careful not to press too hard, as this could damage the shell or irritate your turtle. Focus on areas with visible dirt, but make sure to cover the entire shell to ensure a thorough clean.
Applying a Safe Cleaning Solution
Next, apply a mild, turtle-safe cleaning solution to the shell. Dilute the soap in lukewarm water according to the instructions on the product label. Use the brush to apply the solution evenly across the shell. This helps break down any remaining dirt and algae, making it easier to clean.
Scrubbing Techniques for Stubborn Dirt
For stubborn dirt or algae, use a slightly firmer brushing technique. Apply gentle pressure and focus on the areas with the most buildup. Avoid using abrasive tools or harsh scrubbing motions, as these can damage the shell. If necessary, let the cleaning solution sit for a few minutes to loosen the dirt before scrubbing.
E. Rinsing the Shell Thoroughly
Once you’ve finished scrubbing, rinse the shell thoroughly with clean, lukewarm water. Make sure to remove all traces of soap to prevent any irritation to your turtle’s skin. Use a soft towel to gently pat the shell dry. Ensure the shell is completely dry before returning your turtle to its habitat to avoid any moisture-related issues.
Natural Cleaning Methods
Using Warm Water and Mild Soap
One easy way to clean your turtle’s shell is with warm water and mild soap. Fill a bowl with lukewarm water and add a little mild soap. Dip a soft brush in the soapy water and gently scrub the shell. This helps get rid of dirt without using strong chemicals.
Vinegar Solution for Mineral Deposits
If your turtle’s shell has hard, white spots, you can use a vinegar solution to clean them. Stir together equal parts of white vinegar and water in a bowl. Apply this mixture to the spots with a soft brush. The vinegar helps break down the hard deposits. Afterward, rinse the shell well with clean water to remove any vinegar.
Coconut Oil for Shine and Conditioning
Coconut oil can make your turtle’s shell shiny and healthy. After you’ve cleaned and dried the shell, put a small amount of coconut oil on a soft cloth. Rub the oil gently onto the shell in a circular motion. This helps keep the shell shiny and moisturized.
Addressing Common Shell Issues
Removing Algae Growth
Algae can sometimes grow on your turtle’s shell, especially if it’s kept in a tank with a lot of light. To remove algae, use a soft brush with a mix of warm water and mild soap. Gently scrub the algae-covered areas until they are clean. Rinse the shell thoroughly with fresh water to remove any soap and algae. If algae persists, you might need to clean the tank more frequently to prevent it from coming back.
Dealing with Shell Rot
Shell rot is a serious condition where parts of the shell become soft or discolored. If you see these signs, it’s important to take action right away. Start by cleaning the shell gently with warm water and mild soap. Avoid scrubbing too hard. If the rot is severe or spreading, contact a veterinarian immediately. They can provide the right treatment to help your turtle recover.
Treating Minor Scratches and Abrasions
Minor scratches and abrasions on your turtle’s shell can be treated at home. Begin by gently washing the area with warm water and mild soap. After cleaning, apply a small amount of coconut oil to the scratch to help it heal. If the scratch looks deep or doesn’t improve, visit a vet to make sure there’s no infection or more serious damage.
Post-Cleaning Care
Drying the Shell Properly
After cleaning your turtle’s shell, it’s important to dry it properly. Use a soft towel to gently pat the shell dry. Make sure the shell is completely dry before placing your turtle back in its habitat. This helps prevent any moisture-related issues, such as mold or infections.
Applying Turtle-Safe Moisturizers
To keep your turtle’s shell healthy and shiny, you can apply turtle-safe moisturizers. Use a small amount of coconut oil or a special turtle shell conditioner. Gently rub the moisturizer onto the shell to keep it hydrated and protected. Avoid using any products that are not specifically designed for turtles, as they might cause harm.
UV Exposure for Shell Health
UV light is essential for your turtle’s health and shell development. Make sure your turtle has access to UVB lighting in its habitat. UVB light helps your turtle produce vitamin D3, which is crucial for healthy shell growth and overall well-being. Check that the light is positioned correctly and replace it as needed to ensure your turtle gets the right amount of UV exposure.
Maintaining a Clean Shell
Regular Cleaning Schedule
To keep your turtle’s shell in great condition, establish a regular cleaning schedule. Clean the shell every few weeks to remove dirt and prevent algae buildup. Regular cleaning helps maintain shell health and keeps your turtle comfortable. Stick to the schedule to ensure your turtle’s shell stays clean and healthy.
Proper Habitat Maintenance
Maintaining a clean habitat is just as important as cleaning the shell. Regularly change the water in your turtle’s tank, and clean the tank to prevent the growth of algae and bacteria. Make sure the habitat has the right temperature and lighting for your turtle’s needs. A clean and well-maintained environment supports your turtle’s overall health and helps keep its shell in good shape.
Balanced Diet for Optimal Shell Health
A balanced diet is crucial for your turtle’s shell health. Provide a mix of commercial turtle food, fresh vegetables, and occasional fruits. Different turtle species have different dietary needs, so research what’s best for your turtle. A nutritious diet helps support strong shell growth and overall well-being.
When to Seek Professional Help
Signs of Serious Shell Problems
Sometimes, your turtle might need a vet if there are big problems with its shell. Watch for these signs:
- Cracks or Fractures: If you see big or deep cracks, it might mean something is seriously wrong.
- Soft or Mushy Areas: Soft spots on the shell could be shell rot or an infection.
- Discoloration: If the shell changes color or has dark or white spots, it might be a sign of a health issue.
- Persistent Algae or Dirt: If cleaning doesn’t help, there could be a more serious problem.
If you notice any of these signs, it’s a good idea to visit a vet who knows about reptiles.
B. Finding a Reptile Veterinarian
To find the right vet for your turtle, look for one who has experience with reptiles. You can ask for suggestions from pet stores, turtle clubs, or check online. Make sure the vet has good reviews and is known for treating reptiles well. A reptile vet can give your turtle the expert care it needs for serious shell problems.
Read more: Turtle Shell Fungus
Conclusion
Keeping your turtle’s shell clean is essential for its health and happiness. By following these steps on how to clean a turtle shell, you can ensure your pet stays comfortable and its shell remains in great shape. Regular cleaning, proper habitat care, and a balanced diet all contribute to a healthy shell.
If you have any concerns or need more information, visit us at Theturtles.info. We offer helpful tips and resources to support you in caring for your turtle.
Thank you for reading, and happy turtle-keeping!
Frequently Asked Questions (FAQs): How to Clean a Turtle Shell
How often should I clean my turtle’s shell?
You should clean your turtle’s shell every few weeks. Regular cleaning helps remove dirt and algae buildup and keeps your turtle’s shell healthy.
Can I use regular soap to clean my turtle’s shell?
No, you should use mild, turtle-safe soap for cleaning. Regular soaps or detergents can harm your turtle. Always choose a gentle soap that’s safe for reptiles.
How can I remove stubborn algae from my turtle’s shell?
For stubborn algae, use a mixture of white vinegar and water. Apply it with a soft brush, then rinse thoroughly with clean water. This helps dissolve and remove the algae.
Is it okay to use a hard brush to clean the shell?
No, avoid using hard brushes. They can scratch and damage the shell. Use a soft brush to clean gently and effectively.
What should I do if I notice shell rot?
If you see soft or discolored areas on the shell, it could be shell rot. Clean the shell gently and consult a reptile veterinarian as soon as possible for proper treatment.
How do I properly dry my turtle’s shell after cleaning?
After cleaning, gently pat the shell dry with a soft towel. Make sure the shell is completely dry before putting your turtle back in its habitat.
Can I use coconut oil on my turtle’s shell?
Yes, coconut oil is safe for adding shine and conditioning the shell. Apply a small amount after cleaning and drying the shell to keep it healthy and shiny.
What if my turtle has scratches or abrasions on its shell?
For minor scratches, clean the area and apply a bit of coconut oil to help with healing. If the scratches look deep or don’t improve, visit a reptile vet for further care.
How important is UV light for my turtle’s shell health?
UV light is very important. It helps your turtle produce vitamin D3, which is essential for healthy shell growth. Make sure your turtle has access to UVB lighting in its habitat.
Where can I find more information about turtle care?
For more tips and information on turtle care, visit Theturtles.info. We offer valuable resources to help you take great care of your turtle.